
Weeks 9 - 12
Illustration in Response to Written Words - Protest Packs
For our final project of the semester we were tasked with creating Protest Packs about something we feel strongly about. This project was a lot broader than the ones that had come before; and was left up to us what would be included in the protest pack. But the outcomes should be something that is made up of slogans, banners, posters etc to convey the voice of the cause.
The pack should be able to be interacted with online, as well as in the real world and be able to be used by anyone to join in the fight.
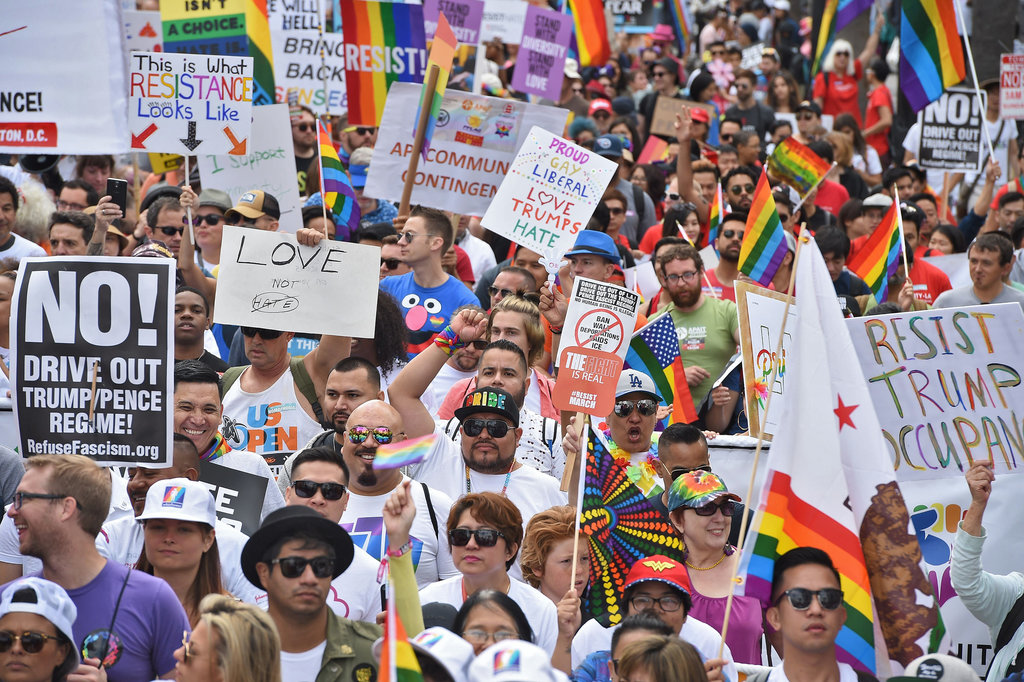
Forms of protest
Looking at different protest, there are a wide range of different things that can be used to make up a protest pack. Some are more obvious such as signs, whilst others as smaller and help promote the protest - such as stickers. Possible ideas for the protest pack include;
- Signs / Placards
- Posters
- Stickers
- Pins
- Apparel- eg. bags, shirts etc.
- Floor stickers
Illustration in Response to Written Words - Protest Packs
For our final project of the semester we were tasked with creating Protest Packs about something we feel strongly about. This project was a lot broader than the ones that had come before; and was left up to us what would be included in the protest pack. But the outcomes should be something that is made up of slogans, banners, posters etc to convey the voice of the cause.
The pack should be able to be interacted with online, as well as in the real world and be able to be used by anyone to join in the fight.
Forms of protest
Looking at different protest, there are a wide range of different things that can be used to make up a protest pack. Some are more obvious such as signs, whilst others as smaller and help promote the protest - such as stickers. Possible ideas for the protest pack include;
- Signs / Placards
- Posters
- Stickers
- Pins
- Apparel- eg. bags, shirts etc.
- Floor stickers


Protest Idea
After thinking about different protests to do my protest pack on, I decided to chose the fur industry. In our modern times, fur has no practical use anymore, instead it is used to show status in society; ranging from celebrities wearing full fur coats, to ever day people wearing coats that are known to also use fur in places such as hood trims. Yearly, over 100 million animals are killed for their fur. That's equal to three animals an second for their pelts. This however doesn't account for rabbits, estimated to be culled in over the 100s of millions. Hundreds of thousands of baby seals are also killed annually for their pelts in what has been named as the 'Canadian Seal Hunt'.
Although many brands have stopped using real fur; including Versace, Calvin Klein, Gucci, Ralph Lauren and Vivienne Westwood, there are still plenty that do. DKNY, Fendi, Louis Vuitton, Marc Jacobs are just some of the high end fashion brands that still use fur. The pressure put on fashion brands does have an effect of their actions. Canada Goose had announced in 2021 that by the end of 2022 they will no longer use fur on their coats.
Articles

|

|
|
Greenpeace, Lynx
|
Fur Free Alliance
|
|
|
|
Lynx - Fighting the Fur Trade


Peta


Intended Audience
After our first feedback session, I was asked to think about how my Protest Pack could be used; was it going to be used to inform or try and make change? Upon doing some research, I believe it made more sense to target the everyday consumer as opposed to celebrities as it was more likely to make an impact. With that said, it is because of celebrities that fur is making a comeback as so could be included in some way.
One of the biggest problems is celebrity endorsement. This leads to more people wanting to own what the celebrities have, and thus more sales. Even though it is mainly fashion brands that supply celebrities fur coats, smaller high street brands supply the public wanting to follow in their footsteps.
For this reason I intend to target the high street shoppers - informing and reminding them where their purchases come from - focusing on individual garments/stores.
When looking into specifically high street brands, there are a few stores that do still sell real fur, including; Harrods, House of Frazer, Parajumpers, and Canada Goose.
Having narrowed down the problem, possible pieces that could be made include;
- Stickers - to go over or on the price tag. The buyer has to look at it, and would be more effective placed there.
- Faux Price Tag - provide information. Intended to go side by side with the garments real price tag.
- Pin - similar to stickers, intended to spread message. Notable logo.
- Posters / Signs over advertising - covering the advertisement to uncover where the garment came from. At the focus of the buyer.
Logo Design / Sticker Design
When looking at the ideas I had, one of the things that seemed to make sense, was to have a re-occurring logo or slogan that could be easily applied to the different protest parts. This would make the different pieces of the protest more coherent and ensure that the whole protest as a whole can be associated to each other easily.
When looking at the ideas I had, one of the things that seemed to make sense, was to have a re-occurring logo or slogan that could be easily applied to the different protest parts. This would make the different pieces of the protest more coherent and ensure that the whole protest as a whole can be associated to each other easily.

|

|


|
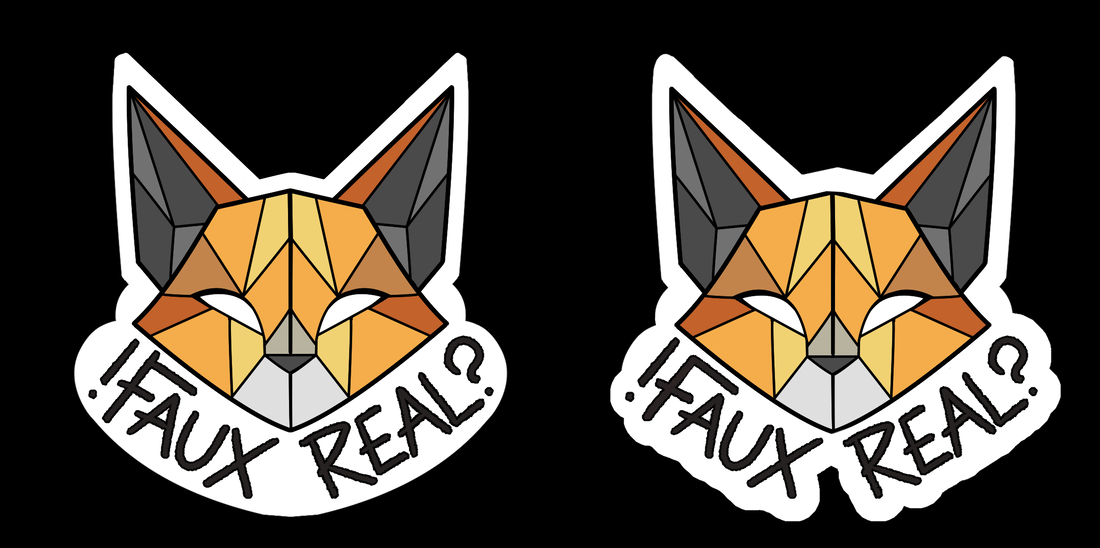
After refining the logo, I decided to only keep the two words as it looked more even. I also decided that the words looked better when smoothened out like the main lines of the design. Yet as for the cutting out of the logo, looked better following the text rather than trying to cram it all into a circular shape.
|

|

|

|
|
In the end I was fairly happy with how this design turned out. I decided to use half and half of the fox's face to represent the before and after of the fur trade - as once an animal is killed for it's fur, the rest of it is useless. In using a muted colour palette I think this idea was communicated fairly well.
Additionally, the logo was versatile - it could be used as little pieces of protest, such as sticker or pins, whilst also providing branding for individual protest pieces. It would help bring the movement together as opposed to be little pieces of the protest. When refining the design, I decided to make the look of the fox 'softer' and less intimidating. This way, the audience was more likely to feel sympathy for the animal it was representing; a soft innocent animal as opposed to a violent one. Some of my initial designs looked far too intimidating, while ones without lines looked far too soft. |

|
Protest Tag
|
One of the main ideas I followed for this project was the use of tags. This way they would be accessible to print and attach to an item of clothing that is made from fur. As the consumer has to look at the tag of the garment for size, price etc. it would be a prime spot for a protest piece for the fur industry to be included.
Initially I wanted to include three tags, the front, the back and some information. However, I decided against this in the end, as one was to just be written text. I wanted to focus on the illustrative parts of the pack more than the information side. This would lead whoever finds the tags to do their own research - and make their own conclusions. The tag would still serve as a reminder before the consumer bought the garments. One thing I did decide on doing earlier on was making my own typeface. I'd struggled hand writing the logo, and as I wanted something hand-written for that personal touch, it was the most effective solution. |

|

|

|
After writing my own font out and tweaking it to make sure letters lined up properly, I began piecing together the tags. To begin with I decided to do the front of the tag as it was the one that was going to make an appearance more than once.
I quickly decided against my initial idea of having the fox in the circle as it looked disproportionate due to the large ears, and found that it was better to follow the outline shape of the fox head. I added the type on, and decided that having a bar code to replicate the bar code found on normal tags balanced out the composition. After changing the design, and narrowing down the ideas, I came to the conclusion that the tag on the far right was the best outcome; as it looked the most balanced and well communicated.
I quickly decided against my initial idea of having the fox in the circle as it looked disproportionate due to the large ears, and found that it was better to follow the outline shape of the fox head. I added the type on, and decided that having a bar code to replicate the bar code found on normal tags balanced out the composition. After changing the design, and narrowing down the ideas, I came to the conclusion that the tag on the far right was the best outcome; as it looked the most balanced and well communicated.

For the back of the tag, I firstly followed two designs that would fit nicely onto the small tag - made up of simple tag lines. I decided that keeping the same colour scheme throughout the protest was key; and narrowed down my colours to simple blacks, whites and red, matching up with the right side of the main logo.
However, I decided to make an alternate visual for the tag on the left, to keep the theming coherent and to not use too many colours when describing the death of the animals. I also decided to stick with my initial colour scheme for the first tag as I found the red in 'you' sent a clearer message. Making these tags included a lot of moving text and image around in the moment to ensure they looked balanced.
For my second tag, I decided that I wanted a completely different visual, separating the fox's tail and body. Initially I had wanted to focus on coyotes but the name of the animal didn't fit as well as a fox. Once I had the type laid out, I experimented with how to include the visual as the basic outline looked far to empty when comparing the two tags. Thus I included the geometric shapes seen in the main logo to tie them better together. The pop of while to the fox made it stand out far more than with lines alone.


|


|

|

|
|
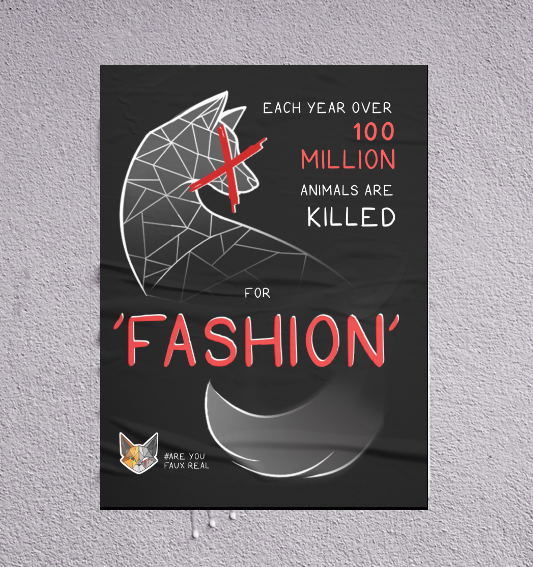
Posters
In addition to my tags, I wanted to create some posters that would be larger, to work alongside my smaller tags. Initially, I wanted this poster to be simple, like the tags to tie them together. Sketching out some rough thumbnails my idea was to have the fox to be an outline - seen in crime scenes. When creating this poster, much like the tags, it was a lot of shuffling positioning of text around. Once I had the outline of the fox completed, I found it more interesting to wrap the text around the back of the fox instead of having the text just sit alongside the image. Out of the two final pieces I made, I decided to keep the text slightly off centre as to not make the piece top heavy. This enabled me to balance out the composition whilst making the most of the curve of the animal. I also added the logo that was present in each of the tags to continue the theming and branding - making it clear it was another piece of the protest. |

|


|

|
When I was attempting to piece together the previous poster, I tried using the fox I had used in the tags, as the split between the tail and the main body was an ideal place for some text. However, I didn't like the way the 'ditch dead' part of the poster looked, and so continued to work with my initial idea for that poster.
However, I still wanted to make the most of the fox and the placement for text. I decided that as a lot of my protest so far lacked facts and relied on bringing attention and leaving the audience making the effort to research, a factual poster would work well in completing my protest pack. |

|

|


|

|
While putting together the poster, I realised that the design would also work well as a sticker due to the round shape. Repeating the steps I had followed for my initial sticker, I made a mock up.
Enamel Pins
When creating the logo, it became apparent that the designs would work well as enamel pins due to their geometrical shapes and simpler colours. So, I decided to make some more designs to make a whole set.
In the end I decided to make the four animals that are most used for fur in the fur trade and fur farms; mink, fox, rabbit and raccoon.
This worked well as each of the animals have distinct features despite them being simple. As well as all sharing natural, yet saturated fur colours to counter the greys and blacks.


|


|

|
After working out the rough colours I wanted for each coloured segment, I refined and worked out the closest pantone colours for each segment. I kept the number of colours at 10 for the main pin colours, and two for the lines - being the black and the red. Making the backing card for the pins took a lot of tweaking - moving different parts around to try and ensure everything looked balanced once the pin was placed on there too. I kept the colour scheme throughout the pins too to make them match with the overall feel of the tags and the sticker, and decided to include the original slogan at the bottom to balance out the backing card as a whole. To make the flat design of the pins look more realistic, I used what I had learnt previously in the Illustrators Toolkit module. To achieve the finished look I added drop shadows and highlights to give depth to each pin. Having learnt how to make pins last semester was important, as I was able to work quicker and more effectively this time around - and was able to make all four of the pin mock ups in one weekend as opposed to two weeks like it had taken last time to learn software and techniques. |


|


|

After Feedback - Final Pieces
To finish off, I acted upon feedback and opinions I received when showing the final pieces. This included making the logo appear softer on the side of the fox that was alive and colourful. To achieve this I gave the fox softer linework colours and gave the fox an eye to make it seem more life like. This pop of colour was effective in conveying the contrast of before and after effects of the fur industry.
Overall, I was happy with my outcomes and mock-ups, as they communicated what I wanted the pack as a whole to communicate. Having a coherent colour scheme helped the final pieces work together, and logo brought everything together. If I had more time I would have liked to have produce more posters / tags to go along with the pack.
Overall, I was happy with my outcomes and mock-ups, as they communicated what I wanted the pack as a whole to communicate. Having a coherent colour scheme helped the final pieces work together, and logo brought everything together. If I had more time I would have liked to have produce more posters / tags to go along with the pack.


|

|
|
|
|


|

|
|
|
|
|
|